Fuel Injection
Crude experiment
I had a riding mower that wouldn't start. It had spark, compression, and plenty of fuel, but no signs of life. I sprayed a bit of carburetor cleaner in the intake and it fired for a few cycles, so it was clearly a fuel problem. The mower was electric start, so it was easy for me to crank it and spray carburetor cleaner at the same time. Each time I sprayed, it would run for several cycles. I could run it indefinitely if I gave it a burst every second or so.

What I had achieved was manual fuel injection. The only difference between my can of carburetor cleaner sprayed at one second intervals and modern electronic fuel injection was an engine control unit to control fuel mixture and sensors to measure engine parameters. Other than that, the principle was the same. This was one of many insights that piqued my interest in fuel injection.
It turned out there was a solenoid that didn't allow fuel into the carburetor. Once I fixed that, the engine ran fine by itself.
Alien Technology
Fuel injection might as well be the modern equivalent of witchcraft. Almost no one knows how it works. Sure, there's an injector in there somewhere and some kind of computer controlling the whole thing, but that's all I knew about it.
Fuel injection and carburetion try to achieve the same goals: meter fuel to achieve a target air/fuel mixture needed to run an internal combustion engine. It's not hard to mix air and fuel to get an engine to run, this has been done successfully for over 100 years. A common lawn mower or weed whacker mixes air and fuel in the proper ratio to reliably operate simple engines. Getting an engine to run is one thing, getting it to run well over a wide range of operating conditions is a completely different matter.
The basic operation of a carburetors is well documented. Air is drawn through a narrow venturi causing pressure to drop which draws fuel into the intake. It sounds simple, and it is. Unfortunately, it gets quite a bit more complicated for automotive use. Unlike a lawn mower, automotive applications must support a range of diverse operating conditions, such as:
- Cold start
- Idle
- Cruise
- Acceleration
- Maximum performance
Modern carburetors are marvels of fluid mechanics. They work surprisingly well given their passive design. A well tuned carburetor can deliver exceptional performance. Unfortunately, carburetors are far from perfect. Managing all of the complexities of driving conditions and emissions standards is just too much to ask from aluminum and brass alone.
The ways of the fuel
Gasoline is not a simple fluid. Unlike water, gasoline is a heterogeneous mixture of alkanes and several additives. The alkanes range from Pentane (five carbon atoms) through Nonane (nine carbon atoms). In addition, there are numerous additives, such as ethanol and detergents as well adjustments for seasonal and regional blends. The consequence is that gasoline boils anywhere between 100 F and 400 F. The low boiling point of the small alkanes, such as Pentane, are what make gasoline so volatile and help engines start in cold weather.
Because of the complexity of gas, a subtle effect known as puddling or wall-wetting takes place inside the intake of an engine. As fuel flows through the intake, some of it will contact colder surfaces where some of the larger alkanes will puddle. Eventually, this puddled gas will evaporate and burn, but it takes time. If the engine is cold, very little gasoline will form a vapor suitable for combustion inside the cylinder. For this reason, warm up enrichment is needed. A cold engine will require almost twice as much fuel to run as a an engine at 130 F. This is the reason carburetors have a choke circuit to either reduce air flow or increase fuel when the engine is cold.
The puddling or wall wetting effect also appears during acceleration. Carburetor manufacturers knew about the consequence of the effect and compensated through the use of a variable venturi or an accelerator pump. It's far from perfect, but it helps considerably in terms of drivability.
It's all in the mix
Gasoline engines require a narrow range of air to fuel ratios (AFR) to operate. The optimum ratio is 14.7 by mass. Slightly richer mixtures produce more power and slightly leaner mixtures offer better economy. Carburetors achieve different mixtures through the use of various size jets where fuel is drawn in. The rate of fuel is proportional to the air flow through the carburetor. It's a very simple and elegant solution. Additionally, accelerator pumps inject a shot of fuel to compensate for wall-wetting during rapid throttle openings. Dr. J. Cowart explains wall-wetting nicely in this video
Fuel injection systems meter fuel by measuring or estimating air flow and injecting the precise amount of fuel needed by the engine. Microprocessors with look up tables can easily compensate for a broader range of operating conditions compared with carburetors. Fuel injection systems estimate quantity of air in the cylinder by measuring air temperature, air pressure within the intake manifold, throttle position, engine temperature, and in closed loop systems, exhaust gas oxygen sensors. Much of how this is done is explained in great detail here and here
Conversion
Armed with this information, and a carburetor that was often uncooperative, I decided to convert my DR350S to electronic fuel injection. In some ways EFI conversion is a kind of Rorschach test. Some find it interesting and intriguing, while others are convinced it is witchcraft and anyone with such an interest should be burned at the stake. I fall into the former category.
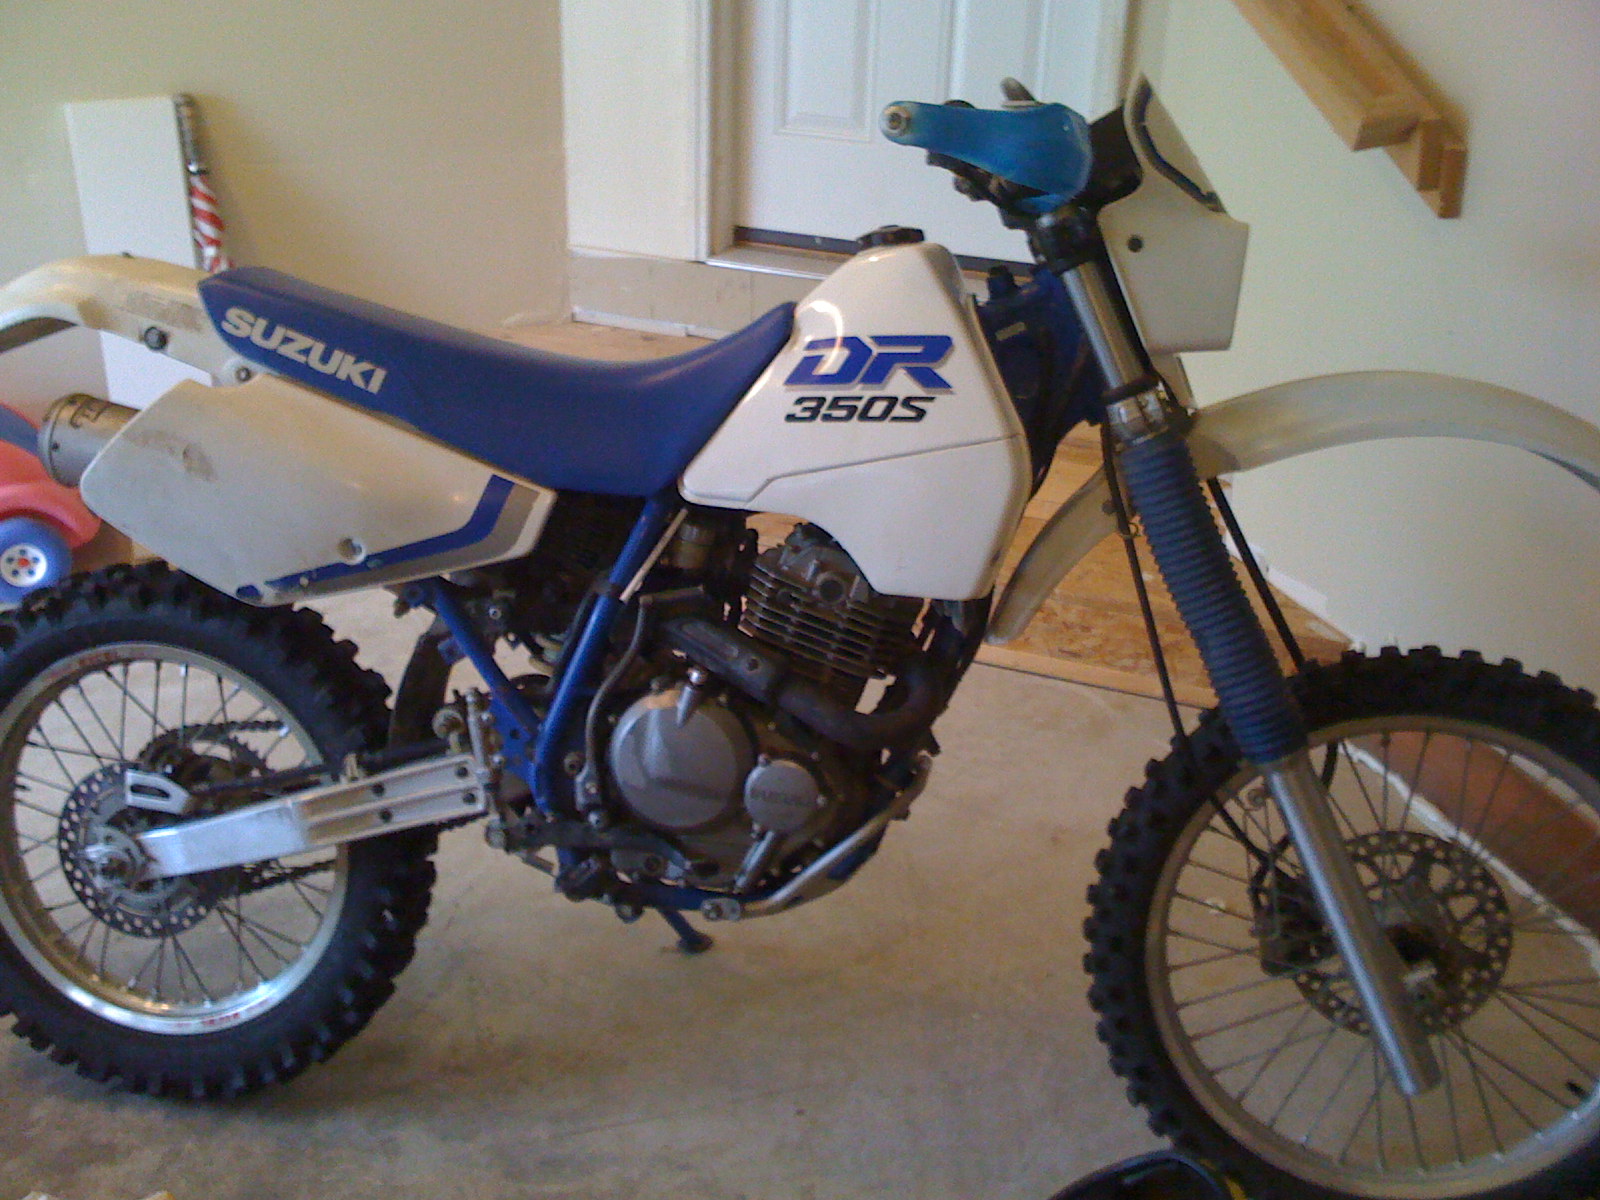
1990 DR350S
There are three phases to the conversion:
- Fuel system design / component selection
- Assembly
- Initial start / tuning
The beauty of fuel injection is that the engine can be tuned to suit a specific goal. This was my reason for the conversion. In a way, a fuel injection system is never complete. There's always something that can be tweaked using only a laptop.
Engine Control Unit
I considered building my own engine management system using an AVR microcontroller. I am confident it could be done, but it would require support systems such as tuning and logging software. I decided to use Megasquirt-I instead. Megasquirt has a wonderful ecosystem built around it, along with numerous enthusiasts around the world with direct experience with fuel injection conversions. I chose Megasquirt due to its modest price and simplicity. I could easily modify any part of the board if needed.
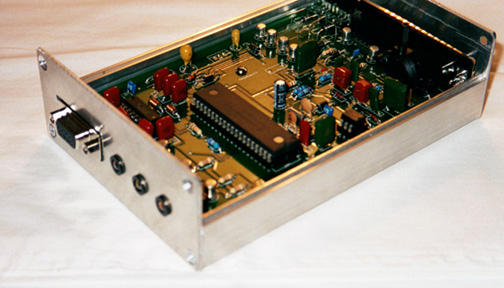
Megasquirt
Throttle body
At first I thought of modifying a spare carburetor by adding an injector. While this can be done, it's unnecessary work. There are many throttle bodies that can be easily adapted for use on motorcycles. In my case, I found that a 2003 Yamaha YZF R6 throttle body was a good fit. Actually, it didn't fit at all. I purchased a stock R6 intake manifold and reamed the mount holes to fit the bolt pattern on my cylinder head. Fortunately, the bolt holes were fairly close. For the air intake boot, I turned an aluminum ring on a lathe to account for the size difference.
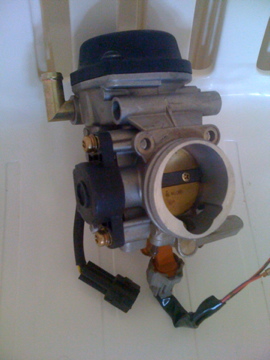
The YZF R6 is a four cylinder engine. Each cylinder has it's own throttle body and an independent injector, but they share a common throttle position sensor (TPS). The image above shows the far right throttle body that includes the TPS. The fuel rail was salvaged, cut, and closed off at the end. You will also notice the black cap on the top of the TB. This particular TB has a slide, similar to a conventional constant velocity (CV) carburetor. I didn't need it, so it was removed. The cap didn't clear the DR frame, so I replaced it with an aluminum plate. You can just see it in the second image.
The R6 injector (orange protrusion above) supplies 240 cc/min when supplied with a standard fuel pressure of 43.5 PSI. This is more than the DR350S needs, but not so much that it makes idle unstable.
Sensors
Fuel injection systems require a number of engine sensors to meter fuel. Two temperature sensors are required to measure intake air temperature (IAT) and coolant temperature (CLT) respectively. I found that common 3K thermistors were satisfactory.
Intake Air Temperature (IAT)
Intake air temperature is used to compensate for air density. I placed a 3K thermistor in the air box side of the throttle body for this purpose.
Coolant temperature (CLT)
Coolant temperature is usually measured to determine warmup enrichment (equivalent to choke on a carbureted engine). The DR350 is an air cooled engine, so it has no coolant. Initially, I mounted the CLT thermistor on an aluminum plate and fastened it to a valve cover bolt. This worked, but I found that air flow at speed cooled off the plate and didn't work well.
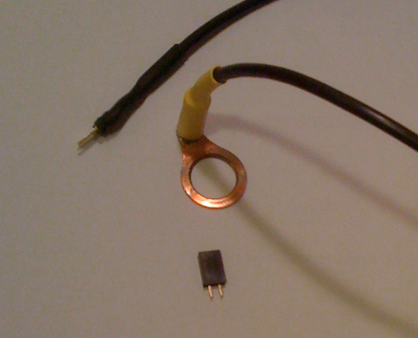
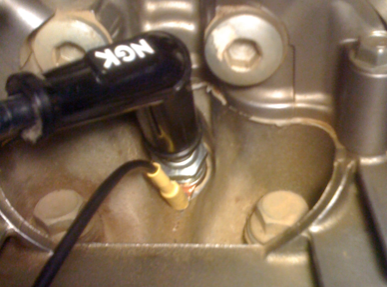
To solve this problem, I modified a 12mm Trail Tech spark plug temperature sensor. The original sensor used a high resistance thermistor that is not compatible with MegaSquirt. I replaced it with a 3K thermistor packed inside a copper cylinder filled with JB-Weld. Here are a couple of images of the sensor before and after installation:
Throttle position (TPS)
The throttle position sensor is a potentiometer splined to the throttle shaft, but also sealed for automotive environments. The TPS on the R6 throttle body is suitable for this purpose. It is normally used for acceleration and deceleration enrichment, but it can be used as the primary sensor for metering fuel when using Alpha-N fuel control algorithms.
Exhaust gas (O2)
Although not required, an exhaust gas oxygen (EGO) sensor is helpful in the tuning phase of the conversion. As a novice at fuel injection, I purchased and installed an Innovate LC-1 wide band O2 sensor with DB gauge:
 Wide band O2 sensor with gauge
Tachometer
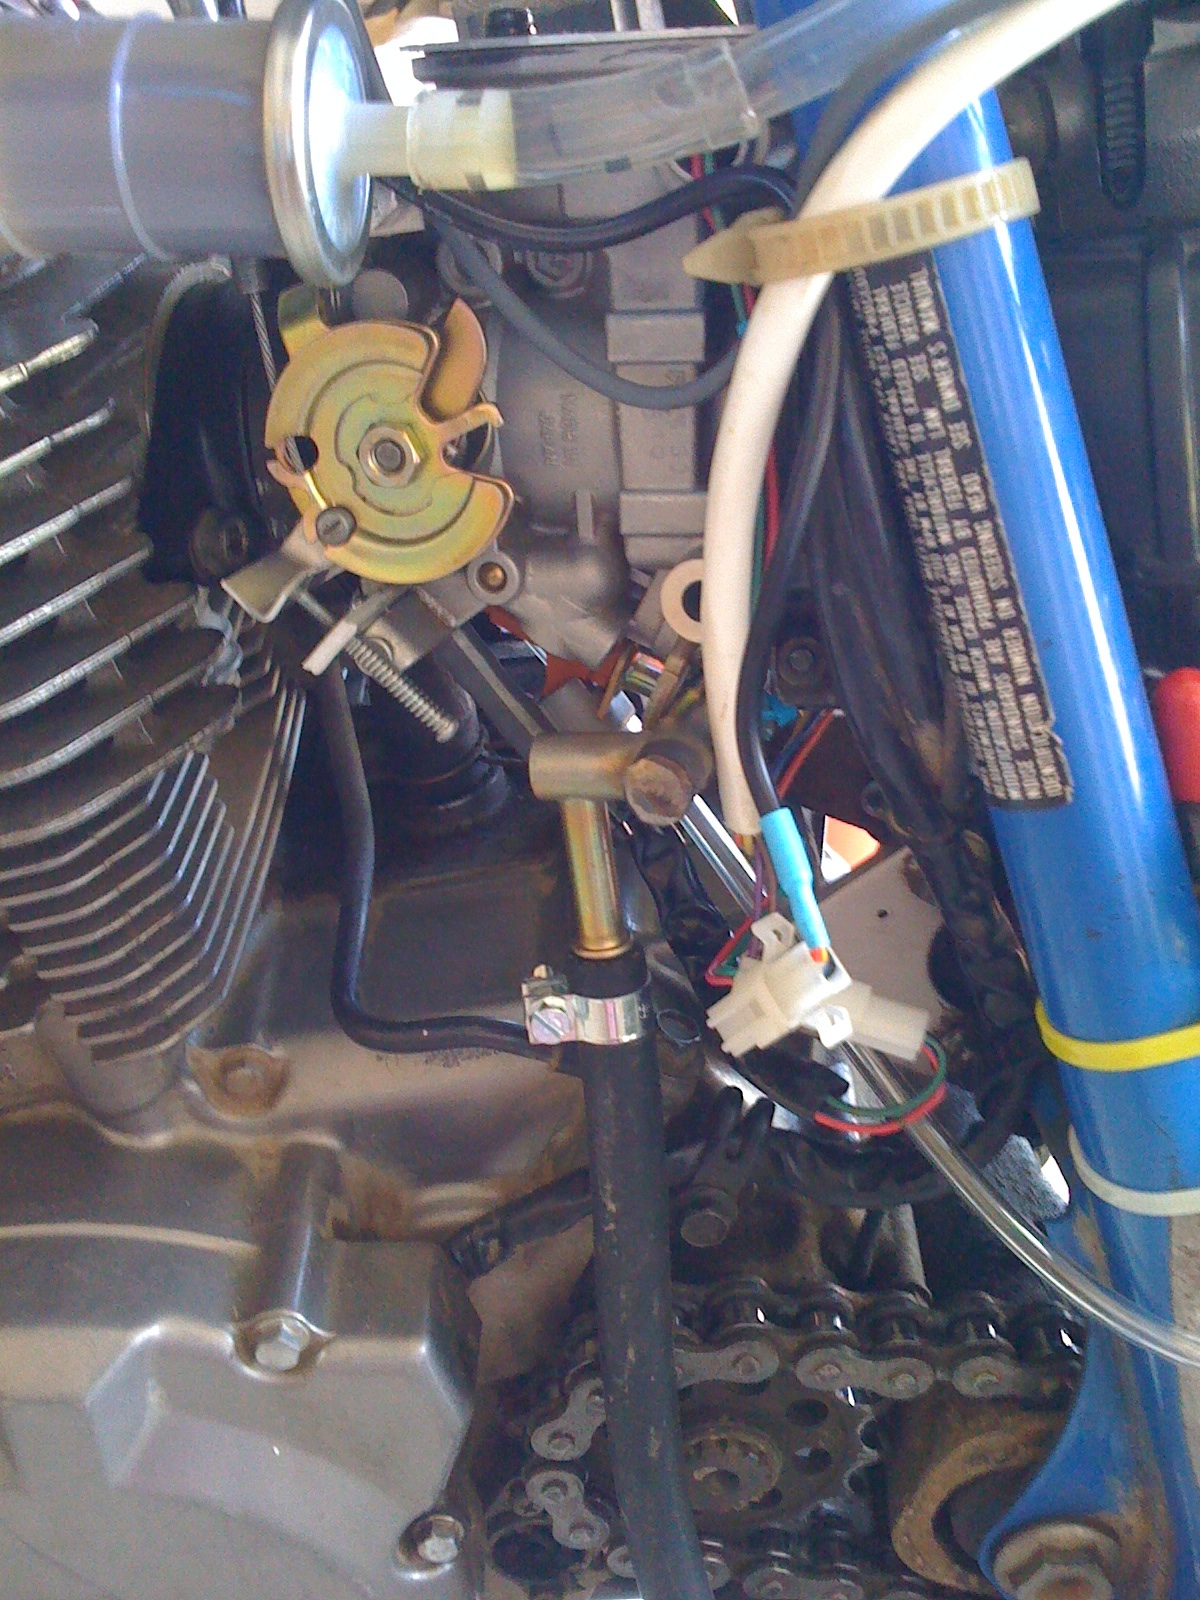
Most importantly, a tachometer sensor is required to determine angular velocity of the engine. EFI ECUs inject a shot of fuel at rate proportional to the engine speed. Megasquirt needs only a single pulse for every rotation of the engine crank shaft. I chose the simple expedient of wrapping approximately 12 turns of wire around the exposed ignition coil body on the DR. As you can see, it generates a rather ugly pulse:
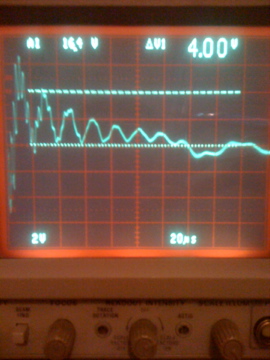
Although it is a simple solution, in retrospect, it is not particularly reliable. Ignition systems tend to be inherently noisy environments, so a fair amount signal conditioning was required. Eventually, I plan to use the pickup coil signal that used by the stock ignition system as the tach trigger. I will also add priming pulse logic so it will start with one kick every time.
Fuel system
Fuel injection systems run at a fairly high pressure, typically 43.5 PSI. While this seems high compared with atmospheric pressure, but it's about the same as common household water supply. It's not as scary as it might seem. However, generating this pressure requires a serious pump. Most EFI systems use a return type system in which a mechanical regulator limits pressure and routes excess fuel back to the fuel tank.
Motorcycle EFI pumps are available at modest cost, although the complete assembly can be quite bulky. The assembly for Suzuki GSX-R pumps includes a mechanical pressure regulator, but it just wouldn't fit anywhere. I found that the pump itself is not large and can be easily removed from the assembly. There were a number of challenges associated with mechanical fuel pressure regulation, so I decided to design my own system to control pressure electronically. Electronic pressure regulation has been used on a number of production cars for years, so it's not new technology. Here's a high level block diagram of the system I put together:
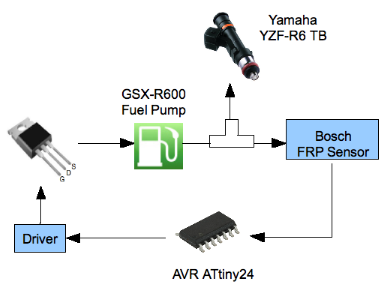
Fuel Rail Pressure Controller
In practice, the pump controller works quite well. The only issue is that on hot days (above 90 F), the pump proper can get fairly warm after about 10 mins. This primarily occurs at idle or low RPM when insufficient fuel is flowing through the pump to cool it off. EFI fuel pumps tend to be very inefficient as only a very small fraction of the power they require is used to push fuel. The pump itself can take plenty of heat, it's the gas that can't. Above 120 F, gas near the surface of the pump inlet can boil, which causes the pump to cavitate and lose pressure. In-tank pumps are designed to be fully immersed in fuel, which helps keep them cool. In-tank pumps also have a pressure relief valve that can leak a small amount of fuel, even when they are operating normally. For these reasons, I eventually decided to build a pump housing using 2" aluminum tube.
The pump controller has gained a fair amount of interest by DIY fuel injection enthusiasts. The controller has been installed on motorcycles, quads, and some cars. You read about some of the success stories from other installations. Purchasing and installation information is available for the fuel pump controller.
First start
On a cold afternoon December 30, 2009, a friend came over for lunch, we planned to stop at Harbinger Freight, but they had no power, so it was closed. Anyway, lunch was good.
We got back to the house and we had a little bit of time, so I grabbed all the FI stuff and laptop and hauled it out to the garage. We monkeyed around for a while setting things up. I ran the bike on the carburetor one last time just to make sure everything was OK. We pulled the carburetor out, squeezed in the R6 throttle body, and hooked up the GSXR 1000 pump. The pump leaked at the seal. After more monkeying and reseating the O-ring, it was better. At this point the bike required several umbilical cords for fuel and power. I hadn't finished mounting everything, I didn't even have a battery. I used a desktop PC power supply as a cheap APU.
I started logging data from the ECU, I didn't want to miss anything. I had no idea where to set the throttle stop, so we started at 10% TPS. Kick, kick, kick. Nothing. Go to 15%. Kick, kick, kick. Nothing. 20%, Kick, kick. Nothing. I'm getting tired, but kicking is keeping me warm in the cold garage! OK, go the other way, down to 5%. Kick. Thump! Kick. Thump! Now we're getting somewhere!
Everything is there, but I have no idea if there's too much fuel or too little. We played with enrichments for a while, it got better. Kick: thump, thump, thump... stop. One thing I have to say is it take no effort to kick it now. A light kick is all it takes. Keep in mind the bike is more or less stone cold.
Kick once more give it gas, vrooooommmm, blub, blub, vroom, blub, lots of smoke. Ok, it's way too rich, even though it's 40 degrees in the garage. I accidentally shut off the fuel pump, but RPM went up and it sounded much better before it died. Reduce all enrichments, turn off afterstart. Light kick, vrooom, better. Go to VE map, reduce entries near idle, still not sure when it updates, but it's better. O2 sensor says way rich. AFR reads 10, but it's not very accurate far away from stoich. Turn the pump back on, reduce VE, light kick, vrooom! Idle goes up. Adjust throttle stop down to stable idle around 1500 RPM. More VE adjustments and AFR is now about 13, that's sweet!
We sat and just watched and listened for a while in amazement. All this talk of throttle bodies, fuel pumps, O2 sensors, injectors, all that stuff is totally abstract. Once you see and hear an engine running fuel injected for the first time... I have no words, it's almost magic.
Tuning
Speed-density is a common fuel injection control method. It estimates air mass in the cylinder by measuring manifold pressure (MAP) and intake air temperature. This is the preferred method for multi-cylinder engines, but tends not to work well on single cylinder engines due to wide pressure variations during an engine cycle. One solution to this problem is to sample MAP synchronous with the intake valve cam at an angle where manifold pressure reaches its minimum. Another solution is to filter the MAP signal and reduce large variations at idle. I attempted this technique with good results, but found that MAP dynamic range was insufficient to tune effectively through the entire operating range, particularly wide throttle openings.
I switched to use the alpha-N control method which does not sample manifold pressure at all, but rather estimates manifold pressure based on throttle angle. This is not an ideal solution, but it is known to work well in practice.
The initial tuning was done in the garage to achieve a stable idle and confirm there are no lean spots. Too rich of a mixture must result in poor performance and economy, but it won't hurt the engine. Excessively lean mixtures can damage the engine under certain conditions.
Once it was safe to ride, I used a Palm m100 with PalmLog to collect real time data during each test ride. At first I would ride gingerly while watching my AFR gauge to make sure the mixture was in the ballpark and never too lean. I would then download the logs to a computer and review them using MegaLogViewer. There are tools to recompute fuel table values based on target AFR settings. This helps to get close to your target, but hand tuning is the best way. I would focus on just a few bins and carefully adjust them until they were just right.
Going forward
In some ways, an EFI project is never complete. There's always something that can be tweaked or improved, simple because it's possible. Here are some plans I'm working on:
- More reliable tach trigger
- Improved fuel table using air flow simulation data
- Logging more data and more variables to SD card
- Smaller, simpler ECU
Lessons learned
In the end, it has a been a very educational project. There were a number of lessons learned that might be of help to others who might considering an EFI conversion, or just interested in how EFI works. Here is a brief summary:
- EFI is not complicated. It's straightforward application of sensors, embedded control systems, and basic thermodynamics.
- Fuel pressure in a modern EFI system is nothing to be scared of. As long as all clamps are tight and fuel injection hose is used, it's quite safe. Fuel leaks are usually limited to occasional slow drips.
- Air/fuel ratio is everything. With the right mixture, any engine with decent compressions and spark timing will start very reliably.
- Obtaining a reliable tach signal is more challenging than it might appear. Automotive environments are electrically noisy and each setup behaves differently.
- A wide band O2 sensor is a good investment.
- There are no gremlins. EFI is completely deterministic. Careful, methodical application of the scientific method will yield predictable results.
- Modern fuels are complex. Understanding what they are made of and how they behave is helpful.